Wednesday, December 17, 2014

Last Minute Gifts: Give a Piece of Austin

Please note that I was given a sample box courtesy of Batch Austin for review.  All thoughts & opinions, as always, are honest & my own.  

The stockings have been hung, the tree trimmed, the baking marathon is about to begin & that means....only a few more shopping days left before Christmas!?!?!  Have you checked everyone off your gift-giving list yet?  If not, you're not alone...I still have one or two items to pick up & a massive pile of goods waiting to be wrapped up & nestled under the tree.  For those last minute gift grabs, might I suggest a few fun ways to give a little taste of Austin to your loved ones both far & away?

These presents just take a moment to find & are sure to put a Texas-sized smile on anyone's face, whether they're a few blocks or a few hundred miles away.

Five Fantastic Austin Gifts


1.  Local-Made Goods Delivered to Their Door.


Batch Austin, which will begin shipping in January, is the easiest way to sample a taste of Austin's finest handmade products.  They offer a monthly service, available in 1, 3, 6 or 12 month increments,  that will deliver some of Austin's best & brightest to anywhere nationwide.  Every package is filled with four local items & each month will offer a different theme. 

I was sent a sample box recently & it was a wonderful mix of tasty treats & indulgent home goodies...I immediately thought of several people who would flip for this Austin-centric subscription.  I was also pleasantly surprised that 3 of out of the 4 items were from companies I hadn't tried before...love it when I can discover new hometown companies!


My favorite item was the San Saba River Poppin' Pecan snack mix.  It's a buttery praline popcorn with plenty of pecans (my fav!)...it was so delicious, Andrew & I gobbled it up on the first day we opened it!


2. An Eclectic Mix they'll be playing well after New Year's.


Each year, one of Austin's most beloved radio stations, KGSR, puts out an exclusive, limited edition compilation of  some of their hottest in-studio recordings.  It always sells out & it's always a beautiful blend of lots of different styles of music, big names & Austin favorites.  This year is no exception with local legend Bob Schneider lending a tune, as well as some of the most talked about Austin-based musicians Max Frost, The Wind & the Wave, Shakey Graves & much more.  KGSR Vol. 22 is sold exclusively at Waterloo Records & proceeds from the sale of this CD will be donated to the SIMS Foundation.  This year’s CD also benefits the Seton Medical Center at the University of Texas. A small portion of the proceeds also go to support KGSR'S Blues on the Green series.


3. Anything from the local section of Book People.  

Book People is a place Andrew & I can spend an afternoon in.  The spirit of Austin can be felt as soon as you walk in the door & they have the best round-up of Austin-based, Texas themed & hometown authored books around.  My favorite section of the store is the local Cookbooks.  I can get lost thumbing through the pages on books about everything from Austin dining guides to BBQ tips.

My top recommendation for Austin Cookbooks is the Trailer Food Diaries series by Tiffany Harelick.  There are three volumes, each filled to the brim with recipes on how to make your favorite dishes from some of the most popular food trucks around the city.  It's the perfect gift for the foodie on your list.


4. A Good Social Calendar.


Just about every week in Austin brings another unique event, & during certain times of the year (hello Spring!) there can be multiple big-name festivities happening on the same day.  It can be tough to keep it all straight, so you never miss out!  That's where the Austin Events calendar comes in handy.  For year's it's been an easy way to see what's going on from week to week & can be found everywhere from Central Market to Costco. 


5. Texas-Made Candy Bigger Than Your Head. 


Millionaires, made by Pangburn's of Texas, is celebrating it's 100th year & what better way to join in on the festivities than giving someone a gigantic Texas shaped box (see my foot in the photo below for a scale of just how big this baby is) of these creamy caramel, pecan filled, chocolate cover treats!  Millionaires have been a staple in my family for years & are a go-to when it comes to giving giving the gift of chocolate.  I've seen these big-as-Texas boxes in HEB, though I am sure there are other stores that carry them as well. 


Monday, December 15, 2014

Great Food Blogger Cookie Swap! Macadamia & Pecan Snowballs


The holidays are almost here!  In my opinion, it's one of the best times of year & one of my favorite ways to celebrate with family & friends is by enjoying a festive cookie!  This year, to help get me in the mood for baking some tasty cookie treats, I participated in the Great Food Blogger Cookie Swap & it was so fun!  This is my first year but this awesome online event has been happening for four years.

Food bloggers get together & are paired with other food bloggers, Secret Santa style.  You create a new cookie recipe, bake it up & send it off to your three matches....folks from all over the country!  In return, you get three boxes of sweet morsels from three completely different bloggers!  Everyone writes about their experience & shares their recipe on their blogs.  It's a really great way to send some baked love to fellow bloggers who become new friends....& a fantastic way for everyone to get new cookie recipes!  Be sure to check out all of the recipes from the swap, they'll definitely be winners for your holiday dessert tables!


Let's start with the delicious goodies I received.  I got Chocolate Peppermint Marshmallow Sandwich Cookies from Hye Thyme Cafe, Peppermint Hot Chocolate Cookies from Nutrition Awareness, & Peppermint Chocolate Cookies from Pickles Travel Blog.  Oh wow, each & every one was so good!  Worthy of a prominent spot on your cookie plates for the special people in your life.  I love that each cookie I got to try featured peppermint & chocolate, one of my favorite flavor combos, especially for the holidays.  I will absolutely be logging on to my partner's websites today to grab their recipes!

Left to right: Chocolate Peppermint Marshmallow Sandwich Cookies from  Hye Thyme Cafe, Peppermint Hot Chocolate Cookies from Nutrition Awareness & Peppermint Chocolate Cookies from Pickles Travel Blog

And surprisingly, every package of cookies I opened held up so well!  I have to commend the USPS for a job well done.  I was afraid that the cookies I sent would end up being nothing but crumbs & that the ones I received might have the same fate, but every cookie in each box I got was still intact.  Very impressive.  And hopefully the treats I sent arrived just as well.

Now, for my soft nutty snowballs.  I sent them to Culinary Couture, Hall Nesting, & It Bakes Me Happy.


One of my favorite cookies has always been pecan sandies or Sand Tarts as they are called in my family.  It seems that most families have a variation of this cookie & the varieties I've had have always been incredibly tasty.  I love that they are simple, filled with pecans (tops in my book) & buttery.  Mmm, butter.  My grandmother also likes these & makes them often for Christmas.

I decided to mix the tradition pecan cookie recipe up a little bit.  I kept in plenty of pecans but added in a few rich macadamia nuts to make them a little fancier & more decadent.  Because Christmas cookies deserve it.  As do your taste buds!  I also decided to drizzle these beauties with a touch of dark chocolate rather than the normal powdered sugar.  I thought they would travel much better this way.  As listed in the recipe below, they can either be rolled in powdered sugar or topped with chocolate.  Both ways are worth the calories. 


Macadamia & Pecan Snowballs

Adapted from Better Homes & Gardens Special Interest Publication, Christmas Cookies, 2013

1 c. butter, softened
1/2 c. powdered sugar
1 egg yolk
1 T. milk
1 tsp. vanilla
2 c. all-purpose flour
1/8 tsp. salt
3/4 c. finely chopped pecans
3/4 c. finely chopped macadamia nuts

Garnish:
3/4 c. powdered sugar, for coating or chocolate melting wafers for drizzling.


Whip butter on medium to high speed for 30 seconds.  Cream in sugar, until combined, scraping sides often.  Mix in egg yolk, milk & vanilla.  Beat in flour & salt.  With a wooden spoon or rubber/silicone spatula, mix in both nuts.  

Cover & chill for at least 30 minutes, but no longer than 60.  

Preheat oven to 325 degrees.  Using a cookie scoop, make small dough balls, 1 in. or so & place on a parchment lined cookie sheet.  Bake 12 - 17 minutes or until the bottoms are lightly browned.  Cool cookies completely on cooling rack.

To garnish, choose from either option.  Melt a few chocolate melting wafers or chocolate chips & drizzle over the top of each cookie. Or place powdered sugar in a large zip top plastic bag & adding a few cookies at a time to the bag, shake (lightly!) to cover in powdered sugar.  

Saturday, December 6, 2014

12 Days of Holiday! Day 12: Boho Mini Tree

Day 12 is finally here!  I've had a blast showing you some of my holiday ideas for 2014.  Hopefully I've inspired you to make you home a little brighter, you meals a little festive & your holiday season a little merrier.

Today's DIY project is so pretty & comes together in a snap, with a few items you can find just about anywhere this time of year.  It's a mini tree with a 'boho' twist.  I've been all about the metallics this season & wanted to do something with those colors for the nook in my upstairs hallway.  On a trip to Target, I spied these white & gold feather gift tags in the Dollar Spot & an idea was born.   A bohemian inspired mini tree was just what I needed to make the corner shelf sparkle.  I love how it turned out.  I think it's a little traditional, with some fun, funky vibes mixed in.  And I think I got just about every metallic color I have on there.  Happy girl right here.


 The supplies for this one is easy & super affordable.  The tree is from a local grocery store & cost a measly $5.  The mini gold, silver & white ornaments where clearance finds from last year.  The sequin ribbon was a score I found at a craft store several months ago & have been saving for a special occasion.  Same thing with the gold chevron.  I love both & have been dying to use them.  The feathers are actually gift tags from Target's Dollar Spot.  The cute burlap & silver poinsettia is from Dollar Tree.  The gold tissue paper is from my gift wrapping stash, but it's easily available at most stores.  And the ornament hangers are from who knows when....I feel like they're the poultry seasoning of Christmas....I buy a new pack of hangers every year because I  am always afraid I don't have any left.


To start, string those beautiful rose gold sequin strings throughout the tree.


Then add a few of the white & gold feather tags.  So pretty!


Some shiny white, gold & silver teeny, tiny ornaments.


Tie a piece of the copper chevron ribbon around the top.


Place the burlap & silver poinsettia just right at the top.


Nestle in a piece or two of shiny gold tissue paper around the bottom & admire your chic new Christmas tree!


Friday, December 5, 2014

12 Days of Holiday! Day 11: Ornament Peace Sign


Items in this post were provided courtesy of Dollar Tree, though all thoughts & opinions are honest & my own. 

Happy Friday!  It's another round of '12 Days of Holiday' & today we're making this cute, metallic Peace sign decor.  Isn't it fun & different.  The ornaments came from Dollar Tree, (12 big 'ol ornaments for 1 tiny dollar!) and I am in love with the colors.  The champagne matte ones are my favorite.  I want to hang them on everything!


To start, gather a package of ornaments, a paper mache peace sign, hot glue gun with several sticks, paint brush & paint in your choice of color.  I chose a yellow gold to contrast with the champagne shimmer of the ornaments.


Paint your peace sign front, back & sides & let dry.


While your sign is drying, pop off the top of your ornaments.  Doing so will help the ornaments stick to your sign later on.  Heat up your glue gun & make sure you have a few extra sticks close by...this project takes a couple.


Turn on a good TV show, because, while this next part is very easy, it also takes a while.  Decide on how close you want to space your ornaments.  On your first spot, put a big dollop of hot glue on your sign, and place the top of the ornament down into the glue.  Hold in place for a couple of minutes, until the glue starts to set.  Repeat until you've made your way all around the sign.  


Allow the sign to dry for a couple of hours before moving it into it's new home.  Enjoy your new merry metallic goodie!


For more creative holiday Dollar Tree crafting & decor ideas, be sure to visit:  www.ILeaveHappy.com

Thursday, December 4, 2014

12 Days of Holiday! Day 10: DIY Gold Deer Ornament

We've only got a few more days left of '12 Days of Holidays' & I've loved sharing some of the ways I'm getting ready for this joyful time of year.  Today, I've got a really fun DIY ornament!

Taking a few paintable & chalkboard plaques from the craft store & combining them with sweet little deer & moose, I made these cheerful little guys that will add an extra bit of sparkle to your tree.


To start, paint your reindeer/moose.  I got these at Michaels, but they're a popular item right now, so you might be able to find them other places.  I decided to paint all of my animals metallic gold, so that the bright stripes would pop.  And there would still be a little shimmer to these.  I have to have some shine!


While those are drying, work on your plaques.  I did a few different things.  For the wooden plaques, I painted them all a pearly white, let it dry & them using small painter's tape or thin washi tape (what I used here) mark off your stripes.  I then painted over the plaque in my desired color.  Once dry, gently pull the tape away.


For the other ornament, I started with a round chalkboard disc.  I marked off stripes, just like with the wooden plaques & then heavily chalked the open space with a white piece of chalk.  Without taking the tape pieces off, I sprayed the disc a few times with a clear protectant spray.  This should help keep the chalk on the disc longer.


After allowing 24 hours or so for everything to be totally dry, I used some heavy duty hot glue & attached the animals to the ornament bases.  I then strung some ribbon through both the hole in the base AND the hole in the animal head to help it hang more evenly.  These are really easy to put together & I just love the look of these.  So cute!


Wednesday, December 3, 2014

12 Days of Holiday! Day 9: Peppermint Bark Cake Doughnuts


Day 9 of '12 Days of Holiday' is upon us & I am so excited to tell you about this one!  It starts with an already delicious recipe for Chocolate Cake Doughnuts from Joy the Baker.  These are my go-to at home doughnuts.  They are simple to throw together, bake in the oven (which makes them healthy right?!?) & are really, really tasty.  I then top these treats with a white chocolate icing, peppermint pieces & a dark chocolate drizzle to make Peppermint Bark Cake Doughnuts.  Awesome!


Peppermint Bark is one of my absolute favorite holiday candies & what better way to have it then on a doughnut?  These are great for an extra special breakfast, but would work just as well as a unique dessert.  And even with the dark chocolate, are totally kid & adult friendly.  They'll gobbled these up in no time.


Peppermint Bark Cake Doughnuts


Start by making Joy the Baker's fabulous Chocolate Cake Doughnuts.  The recipe is found here.  It makes about 10 doughnuts.  While they are cooling, you can start making the white chocolate ganache that will serve as the 'frosting.'


For ganache:

12 oz. bag white chocolate chips
1/2 c. heavy cream
1 T. butter

Toppings: crushed peppermint pieces, dark chocolate (melted)

Place chocolate chips in a glass bowl.  Set aside.  Warm cream over medium to low heat until the cream is almost to the point of boiling.  Remove from heat & pour over chips.  Let them sit, undisturbed for 2 minutes.  Slowly stir, being careful not to spill the cream.  Keep mixing until the chocolate chips & cream are fully incorporated & the mixture is smooth.  Mix in butter & keep whisking until silky.


Take completely cool doughnuts & dip top half into white chocolate ganache, wiping off any excess.  place back on rack, undipped sid down to allow any extra chocolate to drip off.  Top immediately with peppermint pieces.  Drizzle melted chocolate over the top of the doughnuts.  Allow chocolate to set up for a few minutes.  Enjoy!

Monday, December 1, 2014

12 Days of Holiday! Day 8: Dollar Tree Vine Wreath

Items in this post were provided courtesy of Dollar Tree, though all thoughts & opinions are honest & my own.

It's Day 8 of '12 Days of Holiday' & I have another fun, festive wreath that can made in minutes!  This project was made with Dollar Tree goodies, so you can make your holidays sparkle without spending an arm & a leg!


I love decorating with wreaths for any holiday, but especially Christmas!  They just make things happier & you can use them in so many ways that just the front door.

I made this wreath for a silver mirror we have hanging in our upstairs hallway.  I'm trying to spread bits of cheer throughout the entire house & this sweet wreath, along with the reflection it creates down the hall has really jazzed up an otherwise dull space.  And the red bow, adds a bright pop of color!


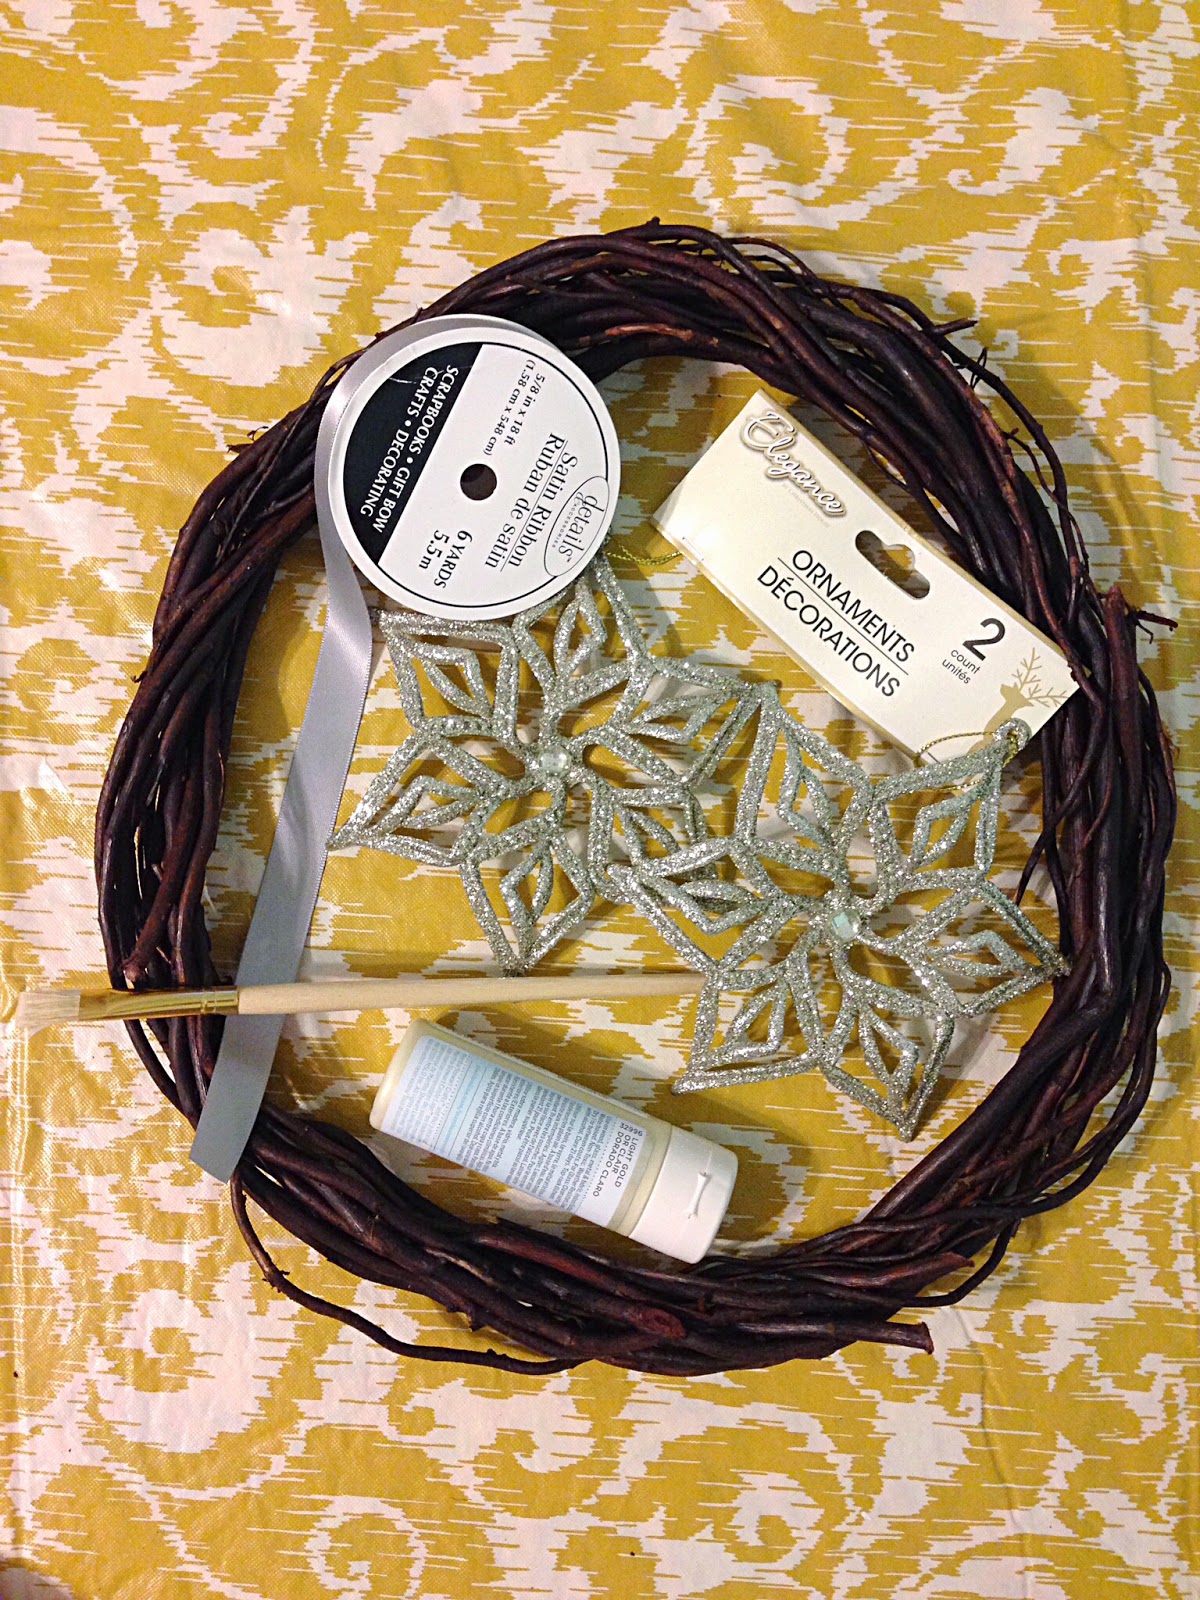
Here's what you need to make your own: a vine wreath, paint (the color I chose is called light gold), a paintbrush, silver ribbon & a package of these fun modern metallic ornaments.  There are two in a package (for just a buck!) but you only need one.  The other is perfect for the tree or another project!


Start by brushing on a little paint on the wreath & then immediately wiping it off.  I wanted there to be a touch of metal & shine, but for the natural wood to still show through.  Let it dry for a few minutes before continuing on with the rest of the project.


Take one ornament, cut off the holder & weave through some silver ribbon.  If you're going to be hanging it on a mirror, be sure to leave enough ribbon on the top so you can secure it on the back side of the mirror.  Secure ribbon to wreath.  You can tie a pretty bow, or cut a few trimmed pieces.


To secure the wreath to the mirror, I used a small suction cup hook attached to the mirror & also fixed the ribbon to the back of the mirror. I attached the ribbon to the back with several pieces of painter's tape, as to not harm the backing.


For more creative holiday Dollar Tree crafting & decor ideas, be sure to visit:  www.ILeaveHappy.com